Assignment Detail
 Updated
by
Arianne G.
Updated
by
Arianne G.
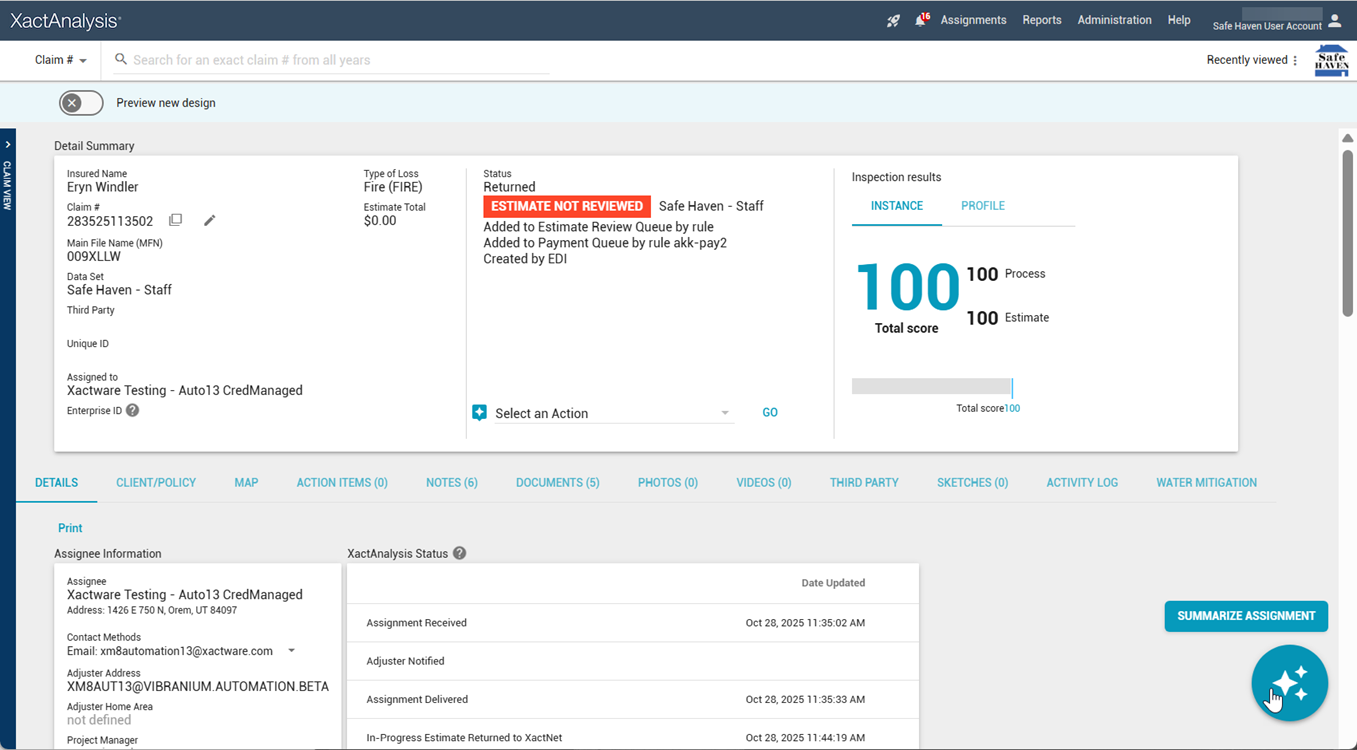
The Assignment Detail page hosts a Detail Summary that includes the insured name, claim number, data set, assignee, status, and estimate total. Assignment Detail also has a Select an Action menu you can use to complete a number of actions, and various tabs from which you can review assignment information, update statuses, and add notes and files.
Access the Assignment Detail page
You can access the Assignment Detail page for a specific assignment in many ways:
- Select an assignment from Search, the XASP Assignment Queue®, or the Management reports and Activity reports.
- Type an insured name or claim number into the Quick Search area on the Welcome page. Click Search.
- Select a claim number from the Recently Viewed Assignments table on the Welcome page.
Assignment Summary
Assignment Summary is an exciting new feature that provides a quick overview of the assignment. It includes an AI-generated summary of the assignment’s notes and loss instructions, along with key claim information, coverages, and the top line items by cost.
To view the assignment summary, select the Summarize Assignment icon in the lower right corner of the page.
Complete actions from the Assignment Detail page
You can complete a number of actions on a specific assignment from the Assignment Detail page:
Details
Reassign
Email Assignment
Select Email Assignment to email the entire Assignment Detail or a selected portion of the Assignment Detail to selected recipients. This may be useful when working with the insured, interested parties, or collaborators.
Send Read-Only Estimate
Request ContentsTrack
Open ClaimXperience™
This option appears if your company has the Policyholder Sharing feature enabled and if you have the Policyholder Sharing application right.
Select Open ClaimXperience to open ClaimXperience in a new tab along with all of the relevant claim information. ClaimXperience allows both you and the policyholder to select and share claim-related documents, notes, and photos. Any files shared by the policyholder are indicated with a Policyholder identifier in the Documents, Notes, and Photos tabs.
Export to (Third Party)
Already Exported to (Third Party)
Request (Third-Party) Roofing Measurement
(Third-Party) Roofing Measurement Already Requested
Resend (Company) Roofing Measurement to Xactimate
Assignment Detail tabs
On the Assignment Detail page, you will see a Detail Summary that includes information about the insured name, claim number, data set, assignee, status, and estimate total. You will also see a number of tabs from which you can review assignment information, update statuses, and add notes and files. The following sections discuss each tab.
DETAILS
The Details tab is displayed by default and shows the assignee information, XactAnalysis® statuses, workflow statuses, and approval statuses (see Statuses for a complete list of statuses in XactAnalysis).
The Assignee Information section displays information about the adjuster or contractor assigned to the assignment and their contact information. The XactAnalysis Status section displays system-based statuses that are automatically tracked by XactAnalysis. The Workflow Status and Approval Status sections display statuses that can be updated manually.
Adjuster or Contractor tasks
The following tasks are usually accomplished by the adjuster or contractor in Xactimate®:
Customer Contacted
Site Inspected
Job Started
Job Completed
Job Not Sold
File examiner tasks
The following tasks are usually accomplished by file examiners:
Reviewer Assigned
Review Accepted
Reviewed with Exceptions
Review Completed
QA Approved
Client Approved
File Status
Other tasks
The following tasks can be accomplished by anyone with appropriate rights:
Collaboration Status
Attention Status
Appointment
Update a status
- Click the Edit icon in the row of the status you want to update. The Update Status dialog appears.
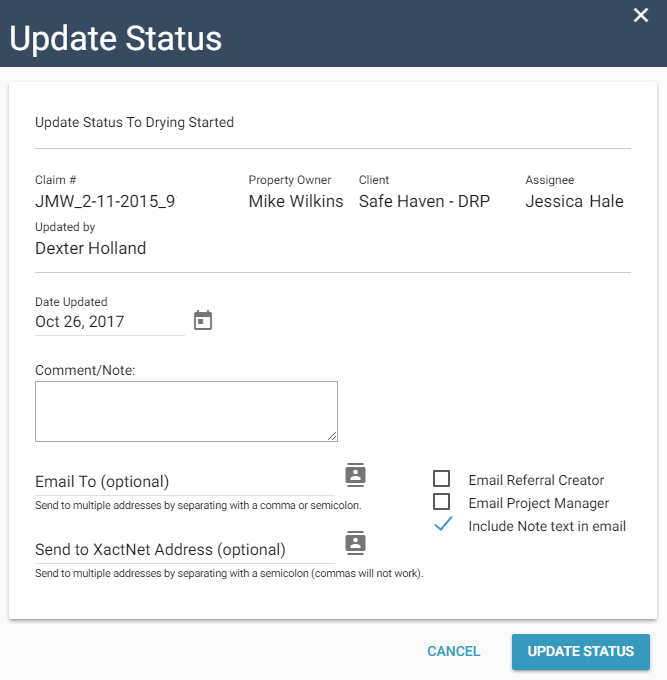
- Complete the Update Status information as follows:
- Date Updated: This field defaults to the current date. You can change the date as needed.
- Comment/Note: Type a note in this field. The note will be added to the Notes tab.
- Email To: Enter a recipient email address or select email addresses from your address book. Select the checkboxes to send an email to additional recipients and to include the Note text in the email.
- Send to XactNet® Address: Enter a recipient XactNet address or select XactNet addresses from your address book. Separate multiple addresses with a semicolon.
- Click Update Status. The status will be updated on the Details tab.
CLIENT/POLICY
The Client/Policy tab displays the property owner and risk information, claim information, client information, and policy information that was entered when the assignment was created.
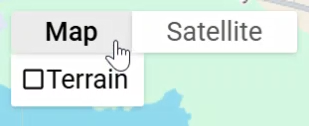
MAP
The Map tab displays a Google Map of the assignment's location.
- Click the Map camera controls icon
 in the lower-right corner of the map to access the camera buttons.
- Click the plus and minus buttons to zoom in and out.
- Click the arrow buttons to move the map up, down, left, or right.
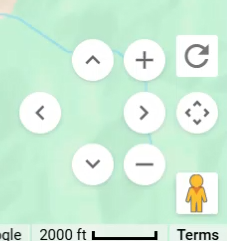
- Click the Fullscreen icon
 in the upper-right corner of the map to expand the map so it fills your entire screen.
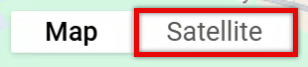
 - Click the Satellite button in the upper-left corner of the map to view the map in satellite imagery mode.
- Hover over the Map button for the Terrain checkbox to appear. You can select the Terrain checkbox to add terrain to the street map.
- Click the pegman icon
 in the lower-right corner of the map and drag it to a location on the map to see actual photo imagery of the location.
 - Click the reset icon
 in the lower-right corner of the map to reset the map with the assignment location in the center.
The coordinates provided in the map are also included in assignment email notifications, along with a link to the location in Google Maps.

ACTION ITEMS
In the Action Items tab, you can view and create action items (or tasks) related to the completion of the assignment. For example, you can create a Customer Contacted action item with a due date of seven days and assign it to the assignment’s adjuster. The adjuster receives an email about the action item. When the adjuster contacts the customer and marks the action item as complete, you receive an email notification. If the adjuster does not complete the action item within seven days, you both receive an email notification.
XactAnalysis automatically updates the status of some action items when certain actions are completed, such as when an estimate is uploaded. You can create action items for these tasks to communicate deadlines and receive notifications if something is past due. Some action items, including all custom action items, must be marked as complete by a user. Past due action items appear red.
Add an action item
- Click Add Action Item. The Add Action Item dialog appears.

- Complete the Add Action Item information as follows:
- Notifications Section
- To Be Performed By: Select the radio button to indicate to whom this task is assigned. You can select either the assignee (for example, the contractor) or the creator of the action item (yourself).
- Notify When Created: Select the Notify When…Created checkbox to notify the assignee or other email recipients when this action item is created.
- Notify When Past Due: Select the Notify When…Past Due checkbox to notify the assignee, yourself, or other email recipients when the action item is not completed by its due date.
- Action Item Information
- Custom: Select this radio button to create a custom action item. Name the action item in the provided field.
- Standard: Select this radio button to create a standard action item. Choose an action item from the menu. See the standard action-item list at the end of this section for more information.
- Due In: Select the radio button to indicate the number of days in which this action item is due. You can select 1, 7, 14, 28 Days, or Other.
- Due Date: This will display the due date or, if you selected Other, allow you to fill in the due date.
- Time: Enter the time at which this action item will be due.
- Comment/Note: Enter any additional notes regarding this action item.
- Click Save.
Delete an action item
- Click Delete next to the action item you wish to delete. A confirmation dialog appears showing the action-item details.
- Click Delete. The action item is removed from the Action Items tab.
Mark an action item complete
- Click Mark Complete next to the action item you want to mark as complete. The Update Status dialog appears.

- Complete the Update Status dialog as follows:
- Date Update: This field defaults to showing the current date. You can change the date if you desire.
- Comment/Note: Type a note in the Comment/Note field.
- Email To: Type any email address to which you would like the note sent, or select email addresses from your address book. By selecting the checkboxes, you can send the email to individuals involved with the assignment, which may include the assignee, referral creator, project manager, or desk adjuster. You can also include the note text in the email.
- Send to XactNet Address: Type any XactNet address to which you would like the note sent, or select XactNet addresses from your address book. Separate multiple addresses with a semicolon.
- Click Update Status. The action item no longer appears in the action-item list, and a note is added to the Notes and Activity Log tabs.
Standard Action Item list
The following list of standard Action Items allows you to set a task:
Assignment Received
Entered Assignment Queue
Send Notification
Download Assignment
Contact Customer
Inspect Job Site
Upload Non $0 Estimate
Upload Estimate
Upload Correction
Upload Report
Submit to Carrier Review Queue
Submit to Service Provider Review Queue
Assign Carrier Reviewer
Assign Service Provider Reviewer
Carrier Review with Exceptions
Carrier Review
Service Provider Review with Exceptions
Service Provider Review
Review with Exceptions
Review
Assigned Out of Assignment Queue
QA Rejected
QA Approved
Collaboration Checked Out
Collaboration Checked In
Client Approved
Client Rejected
Start Work
Complete Job
File Closed
Entered Reinspection Queue
Assign Reinspector
Complete Reinspection
Related: Contact Methods
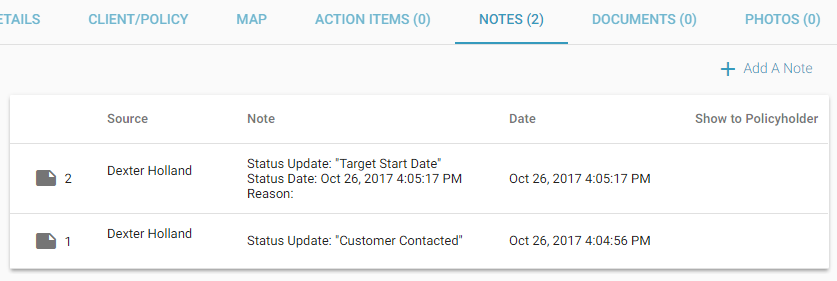
NOTES
In this tab, you can manually enter notes related to the assignment. XactAnalysis also automatically adds system notes as certain assignment events occur, such as status updates or action item events.
Add a note
- Click Add a Note. The Add a Note dialog appears.
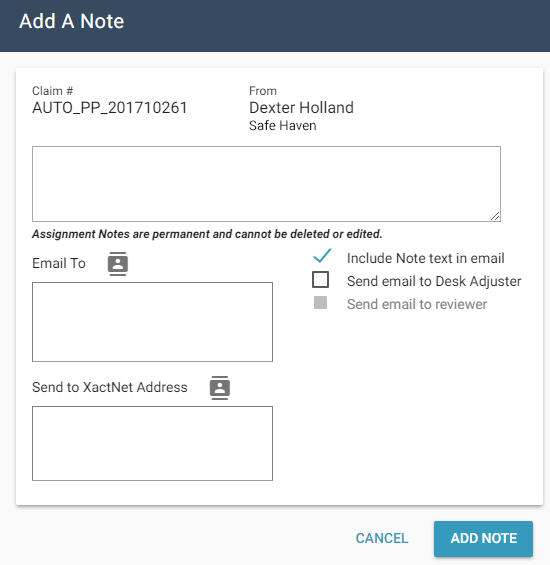
- Complete the Add a Note information as follows:
- Type the text of the note. You can add formatting and use spell check.
- Email To
- Enter any email addresses you would like to notify regarding this note. Each address must be separated by a comma. You can also click the smart list icon to select email addresses from your address book.
- Checkboxes are available that allow you to quickly send the email to individuals involved with the assignment. There are also checkboxes that allow you to include the note in the body of the email notifications and include a custom signature with your notes.
- Send to XactNet Address
- Enter any XactNet address to which you would like the note sent, or select XactNet addresses from your address book. Separate multiple addresses with a semicolon.
- Click Add Note.
DOCUMENTS
Once an estimate is completed and returned to XactAnalysis, it has a number of documents attached, such as the Report Rough Draft, Price List Variation Report, and Audit Report, as well as any custom documents that were uploaded by the adjuster or contractor.
- Click a document name to view it in a separate window.
- Send a document to Xactimate by clicking No in the Send to Xactimate column.
- Compressed: .zip
- Documents: .doc, .docx, .docm, .html, .htm, .mht, .msg, .pdf, .txt, .xls, and .xlsx
- Image: .jpg, .jpeg, and .png
- Sound: .wav, .mp3, and .wma

Add a document
- Click Add Documents. The Upload Documents dialog appears.
- Click Browse. Select the files to upload.
- To upload the document to Xactimate as well, select the Send to Xactimate checkbox.
- Type a file description in the Description field.
- Click Complete Upload. The documents appear in the Documents tab.
- Compressed: .zip
- Documents: .doc, .docx, .docm, .html, .htm, .mht, .msg, .pdf, .txt, .xls, and .xlsx
- Image: .jpg, .jpeg, and .png
- Sound: .wav, .mp3, and .wma

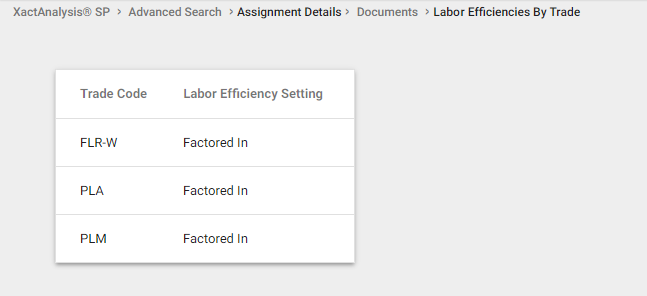
View the Labor Efficiencies by Trade report
When an estimate is created in a version of Xactimate that allows a separate labor efficiency setting by trade, a View Labor Efficiencies by Trade link appears above the document list. The Labor Efficiencies by Trade page displays the labor-efficiency setting that was used for each trade.
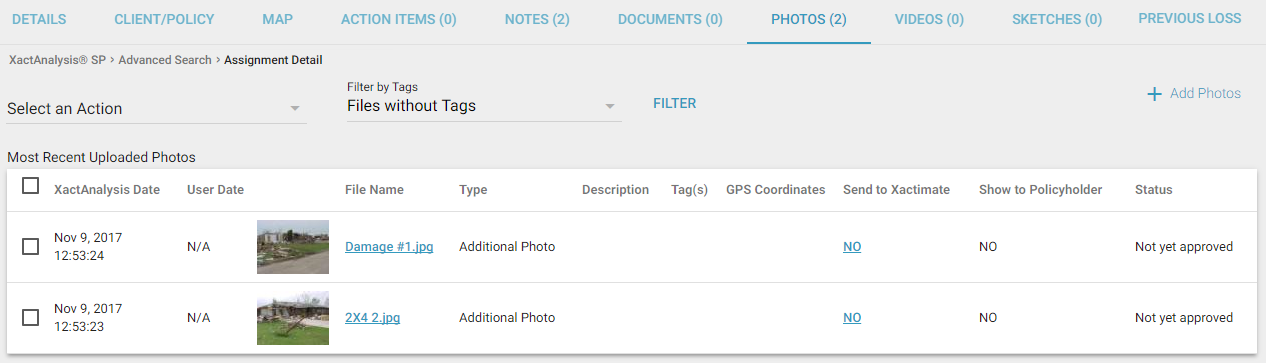
PHOTOS
The Photos tab displays thumbnails of any digital images associated with an assignment. Be careful when you add photos to an assignment. Once uploaded, the images and their associated data, except for the Excluded from XASP column, are permanent and cannot be deleted or edited.
- Click a photo name to view it in a separate window.
- Send individual photos to Xactimate by clicking the link in the Send to Xactimate column.
- Send multiple photos to Xactimate by selecting their checkboxes and clicking Send to Xactimate.
Add a photo
- Click Add Photos. The Upload Images dialog appears.
- Click Browse. Select files to upload.
- Type a file description in the Description field.
- Add Tags, if necessary.
- Click Complete Upload. The photos appear in the Photos tab.
Filter by tags
Photos can be tagged for sorting when they are uploaded to Xactimate or XactAnalysis (see image above).
- Click the menu to the left of the Filter by Tags button.
- Select whether you want to search for photos that have all or any of your selected tags using the appropriate radio button.
- Select the checkboxes of the tags that apply to your search.
- Click Filter by Tags. Only photos with the tags you selected appear in the Photos tab.
VIDEOS
If the Video Collaboration feature is enabled, videos uploaded by policyholders are stored in this tab. You can click a video to watch it in a separate window.

THIRD PARTY
This tab shows which third-party vendors are available to you and allows you to easily submit order requests to them.
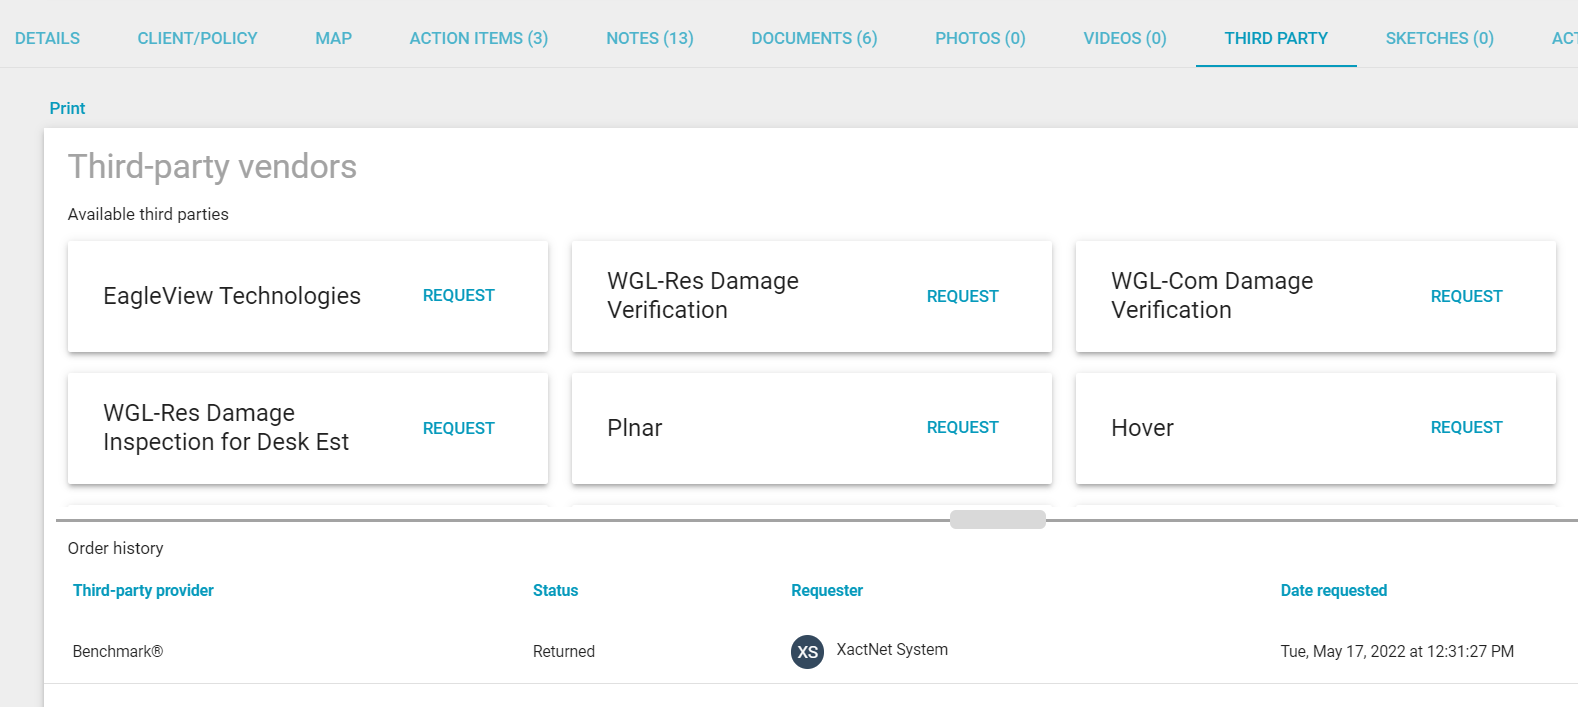
There’s also a table that displays any orders made to your third-party vendors.
SKETCHES
When Xactimate Sketches are uploaded with an estimate, they are rendered as a PDF with one image per level.

HISTORY
If an assignment has been reassigned, a History tab appears on the Assignment Details page. This tab shows the Details tab information for each previously assigned adjuster or contractor. The current assignee information is shown on the Details tab.
PREVIOUS LOSS
The Previous Loss tab displays all loss information from previous claims associated with the policy number. XactAnalysis does this by comparing the policy number of the claim with the policy number of all previous claims. If there is a match, XactAnalysis sends the previous loss information with the assignment. The following information is displayed in both Xactimate and XactAnalysis:
- Policy #
- Claim #
- Date of Loss
- Type of Loss
- Estimate Amount (Gross Estimate Total)
- Deductible
Click the Claim # to view the Assignment Detail for the previous loss.
EXTERNAL REPORTS
When you order reports from third-party vendors, you can click the More Options icon to the right of the tabs and select the report to see information about it.
Depending on the vendor, the actual report could be found here, it could appear as a PDF in the Documents tab, or it could be emailed directly to you.

Related: Xactware Integrations